 The HomeKit how-to guide is a series focused on smart home accessories, automation tips, tricks, and everything to do with Apple’s smart home app and HomeKit framework. In Episode 7, we will look at how to use HomeKit Secure Video within the Home app.
HomeKit Secure Video, first arrived with the Logitech Circle 2 and now the Netatmo Smart Indoor Camera supports the Privacy focused feature. However, things can be a little confusing at first, so here’s my guide on how to use HomeKit Secure Video.
If you want a full and detailed overview of the requirements, costs and kit you need. Then checkout this HomeKit Secure Video everything you need to know guide to get you started. While I would prefer you reading to the end. You can use the table of contents below to navigate.Enable recordings for HomeKit Secure video?
By default, HSV sets all smart camera to “Stream.” While some will see this is an issue with the design, it is how Apple designed it to protect users’ privacy.
To enable recording in HomeKit Secure Video and view them within the Home app timeline, follow these instructions.
- Open the Home App on your iOS device.
- Now navigate to the room you have assigned the camera.
- Open it, then select the “wheel icon” in the top left.
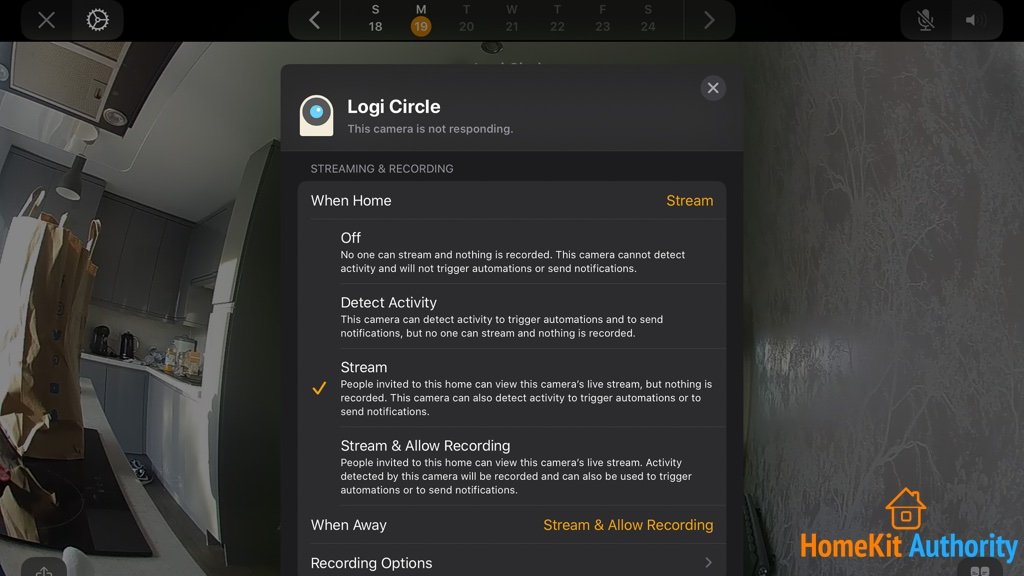
- Scroll down to “stream and recording” options.
- Now set up the required settings to allow recordings based on your preference.
- “Off”–Basically it does nothing. You cannot view the stream, nor will it record.
- “Detect Activity”—Used for triggering automations or to send notifications. But you cannot view the stream, nor will it record and save to iCloud.
- “Stream”—You can view the stream, but it will not record. You can use this camera triggering automations or to send notifications.
- “Stream and allow recording”—You can view the stream and it will record based on your settings. You can also use this camera triggering automations or to send notifications.
HomeKit Secure Video recording settings
Next up is to set up when the camera records and how it deals with motion events. This setting gives you the option to record all motion, or when a specific motion has been detected.
- Open the Home App on your iOS device.
- Now navigate to the room you have assigned the camera.
- Open it, then select the “wheel icon” in the top left.
- Scroll down to “recording options.”
- You then have the choice of recording options.
- Between “Any Motion is detected,” and “Specific motion is detected.”
- If you select specific motion, then you can further drill this down to people, animals or vehicles. You also have the option if you want to record audio or not.
How to change HomeKit Secure Video Notifications
HomeKit Secure Video features notifications and you have a reasonable level of control over these. But you need to experiment with these to get the best settings for you.
- Open the Home App on your iOS device.
- Now navigate to the room you have assigned the camera.
- Open it, then select the “wheel icon” in the top left.
- Scroll down to “stream and recording” options.
- Now set up the required settings to allow recordings based on your preference.
-
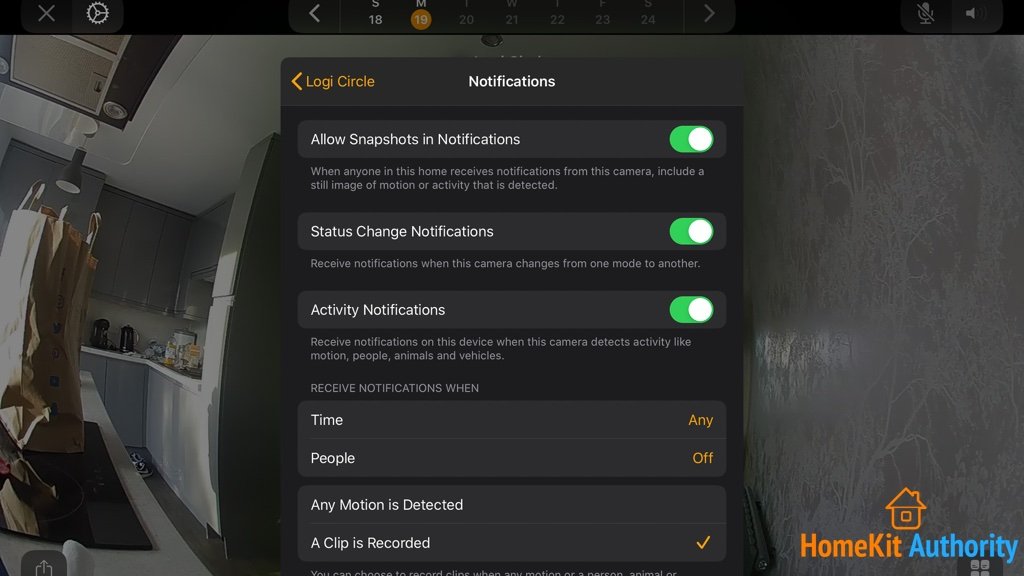
- “Allow snapshots in Notifications”—This includes a still image of motion or when activity has been detected on the camera.
- “Status change notifications”—when the camera changes from one mode to another. So, if it changes from Home settings to away settings, you will get notified.
- “Activity notifications”—Receive a notification when it detects motion for people, animals or vehicles. You can also specify the time of day or when people are present in the home for more control. Finally, you have the option for any motion or when a clip is recorded.
- “Receive Notifications when”– You can choose a certain time of day or when people are home or away.
- Then you have the option just receive notifications when motion is detected or only when a clip is recorded.
Change camera status light and night vision settings in the Home app.
Within the Home app, you have the option to turn off night vision and the camera status light, heres how.
- Open the Home App on your iOS device.
- Now navigate to the room you have assigned the camera.
- Open it, then select the “wheel icon” in the top left.
- Scroll down to “Camera status light” and “Night Vision Light.”
- You can now toggle the required setting on and off.
How to view recordings in HomeKit Secure Video?
Now you have HomeKit Secure Video all setup and its been capturing recordings. It’s now time to view recordings in the HSV timeline.
- Open the Home app on your iOS device.
- Goto the room menu bar and navigate to the room the camera is assigned.
- Tap on the camera you want to view.
- At the bottom you will find a motion event timeline. You can swipe left to right to view the different recordings that have been captured by the camera.
- If you swipe the event timeline, a calendar timeline will appear at the top of your screen. Use this to move to a date if required.
- You can pause playback by using the control to the left of the timeline.
- If you want to jump back to live view, use the control on the right.
How to save recorded video in the Home app?
HomeKit Secure Video feature automatically saves the last 10 days of recordings as part of your iCloud storage subscription. So if you want to keep an important recording, then you will need to save it before it deletes.
- Open the Home App on your iOS device.
- Now navigate to the room you have assigned the camera.
- Swipe to the left or right to navigate to the room that the camera is in.
- Tap on the camera you want to access.
- As explained already above, at the bottom you will find a motion event timeline. You can swipe left to right to view the different recordings.
- Tap on the desired motion event.
- Now Tap the share Icon to the left of the event timeline.
- Tap Next in the top right corner.
- Scroll down and choose how you want to save the video. You save the video directly to your camera roll, the Files app and 3rd party Apps.
How to share recorded video in the Home app?
Aswell as saving HomeKit Secure Video recordings, you can also share them with other people or apps.
- Open the Home App on your iOS device.
- Now navigate to the room you have assigned the camera.
- Swipe to the left or right to navigate to the room that the camera is in.
- Tap on the camera you want to access.
- As explained already above, at the bottom you will find a motion event timeline. You can swipe left to right to view the different recordings.
- Tap on the desired motion event.
- Now Tap the share Icon to the left of the event timeline.
- Tap Next near the top right corner.
- It will then present you with options for Messages, Mail, AirDrop, and 3rd party apps. You should also see a list of your favourite contacts.
How to delete an individual video in the Home app?
You may find a time that you want to delete a clip in HomeKit Secure Video and you can do this right in the Home app. However, it’s worth pointing out your video will deleted permanently, and there is no way to recover it.
- Open the Home App on your iOS device.
- Now navigate to the room you have assigned the camera.
- Swipe to the left or right to navigate to the room that the camera is in.
- Tap on the camera you want to access.
- As explained already above, at the bottom you will find a motion event timeline. You can swipe left to right to view the different recordings.
- Tap on the desired motion event.
- Now Tap the share Icon to the left of the event timeline.
- Tap on the Trash Icon to the right of the timeline.
- Confirm you want to Delete Clip when the prompt appears.
How to delete an all videos in the HomeKit Secure Video?
If you want to delete all clips from HomeKit Secure Video, then you have an option for that. But remember, as with the individual option. All your videos will deleted permanently, and there is no way to recover it. It is also worth pointing out. This will only affect the camera you have chosen. So you will need to complete this action for each camera individually.
- Open the Home App on your iOS device.
- Now navigate to the room you have assigned the camera.
- Open it, then select the “wheel icon” in the top left.
- Scroll down to “recording options” and go into that menu.
- Tap “Erase this cameras recordings.”
- Then confirm when prompted to delete all your recordings from HomeKit Secure Video.


