The HomeKit how-to guide is a series focused on smart home accessories, automation tips, tricks, and everything to do with Apple’s smart home app and HomeKit framework. In Episode 9, I will explain what is a HomeKit Hub and how to set it up. Then how to get the most out of it along with troubleshooting of issues. I will also cover the difference between a HomeKit Hub and a bridge that might come with your HomeKit enabled accessories.
To help with navigation of this article, you can use the table of contents to get to the part that interests you most. Although I do recommended reading it all, as it will help you better understand HomeKit Hubs.
Why do I need a HomeKit Hub?
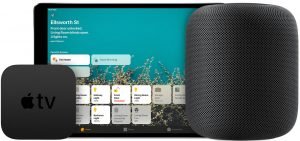
If you have started out using HomeKit and the Home App, but you now want to step things up with automations, access you’re smart devices outside of your home. Then you need a HomeKit to take advantage of these features. For that you need either a 4th-generation Apple TV, Apple TV 4K, iPad, or HomePod.
You also need a HomeKit Hub to use HomeKit Secure Video for any smart cameras that you have which support this feature.
HomeKit Hub vs Bridge
You may think, I already have a bridge that came with my HomeKit accessories such as the Ikea Tradfri gateway. Which may leave you slightly confused why you would need another device to act as HomeKit Hub. Let me explain.
The Hub device that came with your HomeKit accessories will act as a bridge between your accessories and HomeKit. In most cases, without it, your devices could not communicate with HomeKit. However, these devices are limited to the manufacturers accessories.

On the other side, a HomeKit Hub such as an Apple TV cannot link your Hue or Tradfri bulbs into Apple’s framework. This is because the current Apple TV, HomePod and the iPad only support Bluetooth and Wi-Fi. Devices such as the ones mentioned use a wireless protocol called Zigbee.
So unfortunately you will need to still use your bridges, along with a HomeKit Hub at present. However, I am not saying that there will never be a HomeKit hub with multiple wireless protocols to act as a HomeKit Bridge. But we would need to wait and see what Apple deploys in future hardware updates for HomePod and Apple TV.
Setting up your HomeKit Hub
Now that we have established what a HomeKit Hub is and what is does. Lets now look at what you need and how to set them up.
- Apple TV – 4th generation or above
- HomePod – Firmware up to date
- iPad – This needs to be a device that stays within the home at all times and ideally constantly plugged in. For this reason I would recommend using one of the above devices.
Using an Apple TV

Sign into the same iCloud account on the Apple TV by going to Settings. Then Users and Accounts. The Apple TV will do everything else for you and enable this device to be a HomeKit Hub.
To see if your Apple TV is connected as a home hub, go to Settings on your Apple TV. Then go to Users and Accounts and look under Home Hub.
Using HomePod

Like the Apple TV, HomeKit setup on the HomePod is an automatic. All you need to do is set up the HomePod with your iCloud account and then it will do the rest for you.
Using an iPad

If you are not already, sign into your iPad using the same iCloud account as the rest of your iOS devices. Then check that that Home is turned on. Finally go to Settings, tap on Home and select Use this iPad as a Home Hub.
Checking HomeKit Hub connection status
Now you have your HomeKit Hub setup, you may want to check the status or find out which of your devices is your hub?
- Open the Home app.
- On the Home screen of the Home App, tap on the house icon on the top left.
- Tap Home settings, then tap on the home you want to view.
- Scroll down and tap on Hubs & Bridges.
- Under HomeKit hubs, you will see the devices listed
- If you have multiple HomeKit Hubs connected, you will also see the following information.
- Connected status means that this device is acting as your primary HomeKit hub.
- Standby status means that the device will assume the hub role if your primary hub is not available.

HomeKit Settings
Now you are all setup, your HomeKit Hub will work transparent with no further involvement from you. You can now set up automations from within the Home App and access your HomeKit home remotely. If you have an iCloud account of 200GB or above, you can take advantage of HomeKit Secure Video via supported cameras. Supported cameras include the Logitech Circle 2 and the Netatmo smart indoor camera.
Where to position your HomeKit Hub?
When using Bluetooth HomeKit accessories, try to place them as close as possible to your Hub. This will be particularly helpful with Eve devices such as the Eve Energy and Eve Water Guard.
You can also use multiple devices as a HomeKit Hub in your smart home. So, like me, I have an Apple TV in the games room and bedroom with a HomePod in the living room. This means if one is offline, the other HomeKit Hub will take over.
Although one element is about range, you also need to think about other devices or what electrical interference is around the device. For instance, you would want to avoid having your HomePod close to a microwave. I have also heard stories of people having issues with concealing an Apple TV behind a TV.
So when you are thinking about setting up your HomeKit Hub, think about the location of the Bluetooth devices like Eve products that may reply on the connection. Along with other devices that could interfere with the wireless connectivity.
Troubleshooting
If you run into any issues getting access to your Home while you’re out and about or any of your automations, scenes or devices are not working. Then these HomeKit troubleshooting tips should help you resolve problems you encounter.
- Update all your devices to the latest Apple software.
- This may seem like an obvious one, but make sure you connect all of your devices to the internet. Ensure that if you are using a firewall that no ports are being blocked.
- Make sure you log into the same Apple ID on all of your devices. This only needs to be the HomeKit Hub and your primary iOS device you use.
- Make sure you have added any additional user to your HomeKit family
- 5, If all else fails, use the tried and tested “fix all” restart your devices.


Leave a Reply